There is not one person I know who loves doing timesheets. The finance team hate chasing us for them and we hate having to itemise our work day. Even worse is when you come in on a Monday morning and have to remember all of the different jobs you did last week.
We all have to put up with context switching but the support team are constantly switching between customers issues making it very hard to keep an accurate record.
What we want is something that can track time spent on different Jira issues and then post that data to our timesheet system. A little taskbar app could do the trick but you still have to remember to use it when a call comes in. A physical object sitting on the desk would hopefully be more prominent and present less usage friction.
We need something that can display several tasks and allow the user to very quickly and easily switch between them. We discussed using a touch screen but decided that this was not that much of an improvement to using an app on our desktop.
I saw a Kickstarter for a product (ZEI) that is an eight sided (Octahedron) device that had tasks printed on each side, like meeting, phone call or twitter. When you placed a side upwards it would start tracking time against the task. I really liked the idea of this very intuitive physical device that would sit on your desk and you would just flip over to start tracking time against a new task. One issue was that the tasks were written on each side and if we wanted to track jira issues the text displayed on the sides would need to change automatically as they were assigned. What we need is some kind of display and seeing as triangular screens are hard to come by it makes sense to make a cube of screens .
Preparation
Screens
We would have to order all the electronics in advance of the Hackday and this was of course allowed by the rules. We just needed to submit a list of items before the event. We discussed options and the ideal would be square e-ink screen but the only ones we could find were £80 which times 6 would be too expensive for the first one. We then discovered some SSD1306 OLED screens that could be had for as little as £2 each from China. These run on 5v, the same as an Arduino and are also controlled over a serial protocol called I2C. They are well supported by Arduino and we happened to have a bunch of different models at our local Hackspace so I gave one a test run to ensure it would work for us on the day.
First Problem
This is where we hit the first potential hitch. The I2C serial protocol is chainable so you can have as many as 127 devices running on one I2C bus. It is basically a very crude USB protocol and as such each device needs an address so that the data arrives at the intended device. The problem is that these screens could only run two addresses which were set in via a little jumper pads that you soldered over. It looked like this was game over and we would have to rethink the whole thing. A fellow Hackspace member came to the rescue when he pointed out an I2C multiplexer board that he had used to resolve a similar problem with hardcoded I2C address.
The Cube
At the Hackspace we have a 60 watt co2 laser cutter which cuts acrylic very well. There is also a website: http://www.makercase.com/ which takes in the dimensions of the box you desire and outputs a file which can be sent to the laser cutter. While I was at it I also marked out holes so we could bolt the screens to the inside face of the cube.
Which way is up? The only other piece of electronic lego we need is something that can tell us which face of the cube is pointing upwards so we know which task to track time against. Yet again Hackspace members came through with the suggestion of a LIS3DH Triple Axis Accelerometer. This is an amazing little unit that can not only tells you direction in XYZ space but also acceleration meaning it can do gesture detection such as shaking. It would be perfect of we could shake it and the data gets sent to the timesheets system.
Power
A small li-ion battery will provide the 5v along with a small charging circuit board that allows charging over USB. This is where I realise I should have cut a slot in the cube for a USB cable.
Microprocessor
Obviously we need something to run the whole show, something small but with enough cpu to drive 6 screens. We also need to be able to communicate with it wirelessly otherwise the slick user interaction would be utterly ruined. The wonderful open source hardware community has developed the perfect board for us based around the ESP8266 microprocessor. Not only is this chip 14 times faster than the Arduino Atmel chips it also has built in wifi. Even better than that they are cheap at a couple of pounds each. Again there are different versions but I went for the Wemos D1 Mini. Best of all it is compatible with the whole Arduino ecosystem.
Technology Stack
Hardware:
- Wemos ESP8266 microprocessor
- 6 x SSD1306 OLED displays
- LIS3DH Triple Axis Accelerometer
- TCA9548A I2C Multiplexer
- Laser cut acrylic case
- Li-ion battery and USB charger
- Jumper wires
Software:
- VM running Ubuntu v17.04
- Python running Flask
- Redis
- Collection of Arduino libraries
Hackday begins
We discussed what needed to be done and the list was long. There were a couple of clear divisions in the workload. We needed someone to wire up all the screens, multiplexer, accelerometer and Wemos and stuff it into the cube. Someone needed to write the software for the Wemos so it can fetch data from Jira over wifi and render text to the screens. It also needs to monitor the accelerometer and count time. Lastly we needed some server software to bridge between the Wemos and the other services (Jira & Timesheets).
John took on the physical element, Toby took the cube programming and Giran started on the server code.
Cubecode
The beauty of the Arduino ecosystem is that there is a large amount of software available and they normally come well documented and have good starting examples. Arduino was setup as an educational project so most boards have accompanying websites with tutorials on their use. Standard libraries were available for the displays, multiplexer, accelerometer and wifi. We heavily raided all of the examples from each library and made the necessary changes to make it all run together.
Physical cube
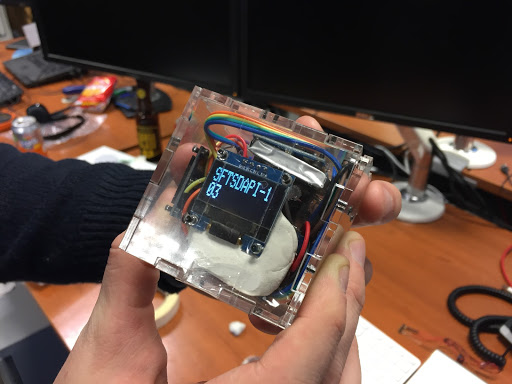
Joining all the parts together (the first time) was a breeze. Jumper wires allowed us to quickly check that all the screens work and that we can set a different image on each display.
Unfortunately, due to the volume of parts, it wasn’t immediately possible to fit 6 screens, the wemos chip, multiplexer, battery, accelerometer and 30+ full length jumper wires into such a small space. Enter wire strippers, solder and heat shrink, for a long night of snipping all 4 wires to each of the screens in half, and soldering the ends back onto the pins of the displays, trying in earnest to isolate them well enough that nothing would connect (that shouldn’t) when crammed back into the 4” cube. This worked, sort of – we had 4 or 5 screens working at one point, but after reassembling the cube multiple times and having to resolder several parts, the number of working screens was dwindling, down to 2 working, and 3 showing static… then down to one working screen by demo time. (That last screen withstood shaking by the audience in the demo!)
Soldering skills notwithstanding, we had a demo-able physical specimen, with which to demonstrate the JIRA connection.
Server Code
For the cube to interact with the server, the following requirements were needed:
- The cube should communicate with a server across WiFi.
- The cube should fetch active Jiras assigned to the current user.
- The cube should post time for the current Jira displayed (top screen) to Synergist.
Given the 24 hour timeline, I decided to use familiar tooling to create a RESTful API for the cube to communicate with; this included Python, Flask, and Redis. I used Flask as it can be used to rapidly prototype a RESTful API and Redis to store the current time worked on the current Jira selected.
Breaking down the workflow of the above requirements, the Python server code handled the following items:
Retrieval of active Jiras:
- The easiest implementation was to create a filter in Jira itself using Jira’s query language (JQL) to display the list of Jiras.
- The server code invoked a GET request to jira.caplin.com for this filter, thus returning a list of active Jiras in a JSON blob.
- Returning the data to Arduino (C/C++) proved a little difficult; the original plan was to send an array of JSON objects with each object being a Jira with the corresponding fields.
- It proved difficult to iterate over an array of JSON objects; thus a single JSON object was sent with each key being a Jira ID and the value being the description.
- If more than 6 Jiras were returned, the cube would only display the most recent items (based on the response from Jira API).
Tracking the current time spent on the current Jira:
- The original idea was to have the current upwards-facing Jira have its time counted in seconds; this would be then normalised to an hour ratio (i.e. x/3600) and stored to Redis.
- The functionality for persisting to Redis was implemented but not the behaviour to indicate the current active Jira.
- Storing the data to Redis acted as safe guard in case the server needed to be rebooted; although this was an unlikely scenario for the hackday demo.
Posting timesheet to Synergist:
- The major pain point for the server code was getting data posted to Synergist, a tricky combination of poor API documents and non-standard methods of posting data.
- There was also a discrepancy between Jira project ids and timesheet code e.g. SNOVOBANK -> NBANK.001 and multiple client projects -> NEWBANK.001
- To circumvent this, a hardcoded map of multiple Jira items were mapped to unique Synergist codes, allowing the Jira project to be posted to the correct timesheet code.
The eventual goal was to post the timesheet data EOD based on data stored in Redis.
Conclusion
The final demo was disappointing to say the least. There was a loose solder joint somewhere in the huge ball of wiring that caused the multiplexer to lose power. Literally 20 minutes before the demo most of the screens were working, but by the time our demo slot came only one screen was operational.
Everyone loved the concept and I believe were impressed by the implementation, but with nothing displaying on the screens we were never going to win. It was good enough to bag us third place so we cannot be disappointed with the result.